Tofu and Vegetable Stir Fry + Easy Almond Butter Sauce

IMG_3863

I promise to get to the stir fry in a second, but first a little bit of self-reflection never hurt anyone 😉

Let’s talk friends, i.e. the family that you choose for yourself, the tribe you willingly associate yourself with, the group of people who serendipitously come into your life (and sometimes back into your life), a network of people that grows roots and supports you through thick and thin. I’ve been compelled to reflect on my friendships these past few weeks – for a variety of reasons, some incredibly good and some quite unsettling. Luckily for me the unsettling bits did not originate from within my circle, but nevertheless I have been one of the affected bystanders hit with a storm of betrayal and lies. All I can say is that I am one fortunate woman to have the friends that I have. More than fortunate. Blessed, in fact, if I may use this clichĂ©d and worn-out, hashtagged to death remark. But it hasn’t always been like this.

About five years ago I ended a very long term, depleted relationship; and even though its conclusion was far overdue and inevitable, it still left me reeling and feeling lost. At that time I had a couple of genuine friendships and a handful of tenuous ones. As I recovered and adjusted to the aftermath, I engaged in new hobbies, rediscovered forgotten ones and started making connections  with people from all walks of life. In the midst of this flurry of new faces, I found those that have now solidified into friendships that I deeply treasure. I’m not gonna lie, it wasn’t easy for me at first. Over a decade since high school graduation (where I was a shy and reserved creature) I wasn’t sure HOW to make friends. Sounds ridiculous, right? But I wager that many adults just aren’t sure how to navigate the friend-making landscape. It gets a bit more complicated once you’re past the point of playing in the school yard, where a short recess spent kicking a ball around or playing hopscotch leads into the best-friends-forever realm. In any case, I guess somehow I figured it out. Five years later I am surrounded by people that make me a better person. And that’s the ultimate jackpot right there. The friendships that I have made over the last few years, as well as those that have endured the growing up years, have shown me how to be a more caring, empathetic, authentic, giving, loving, generous person. I am still learning and VERY much a work in progress. But as I reflect on the me pre-big-life-changing-breakup to the current me, it still astonishes me how much I have changed. And entirely (mostly) for the better. And all because of my tribe. I mean these people who willingly spend time with me are selflessly taking care of sick family members, raising smart and kind children, organizing care packages for those in need of a pick-me-up or some extra TLC, volunteering in their communities, reaching out to those who are isolated, and tirelessly setting an example of what a good human being should look like. It is impossible for some of that not to rub off on me. Like glitter off a princess Barbie, that stuff really sticks! And so I am grateful, and thankful, and blessed, and indebted to the universe for my friends. How did  I ever get so lucky.

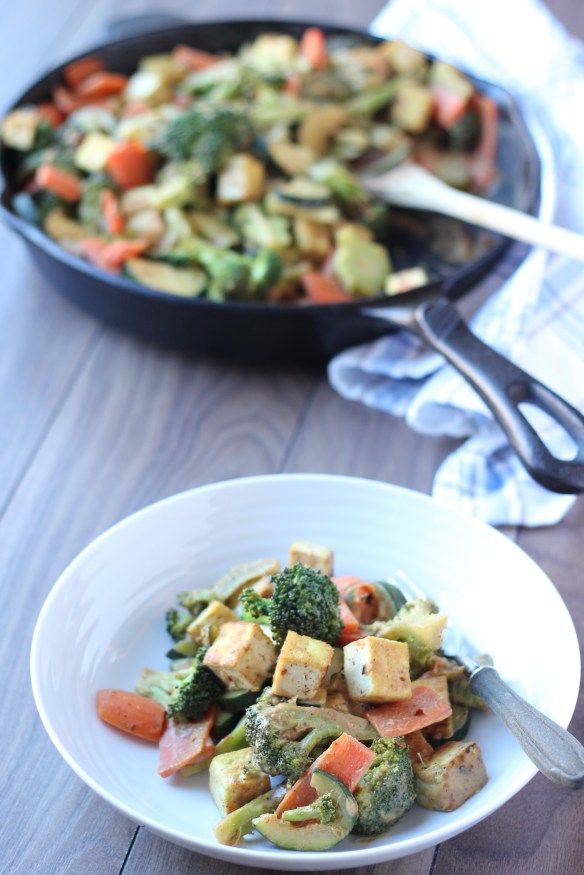
And now for a clever segue to this stir fry. Well, I guess just like my friendships, this dish is uncomplicated, nourishing, deeply satisfying and rich in flavour. Kind of proud of what I just did there. Okay, please don’t leave. I promise I’m done now.

This recipe is a more formalized version of something that I have  been cooking for years – except that in the past I would just throw a bunch of dashes of this and that straight into the pan and somehow it would turn out. But people want numbers and proportions and so I nailed it down for you!

IMG_3851IMG_3855

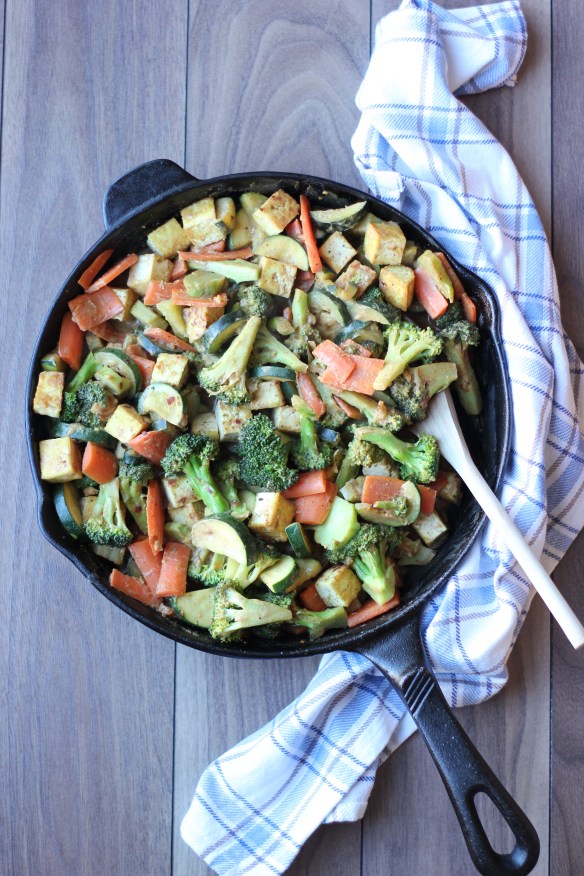
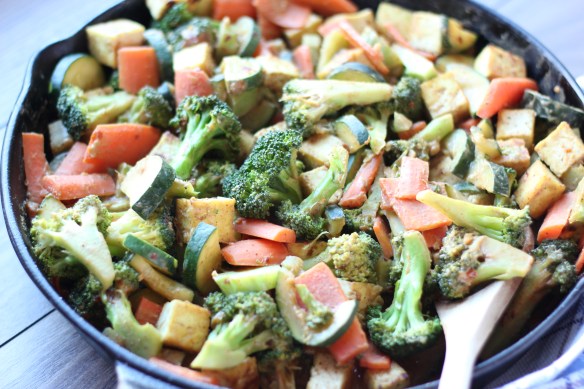
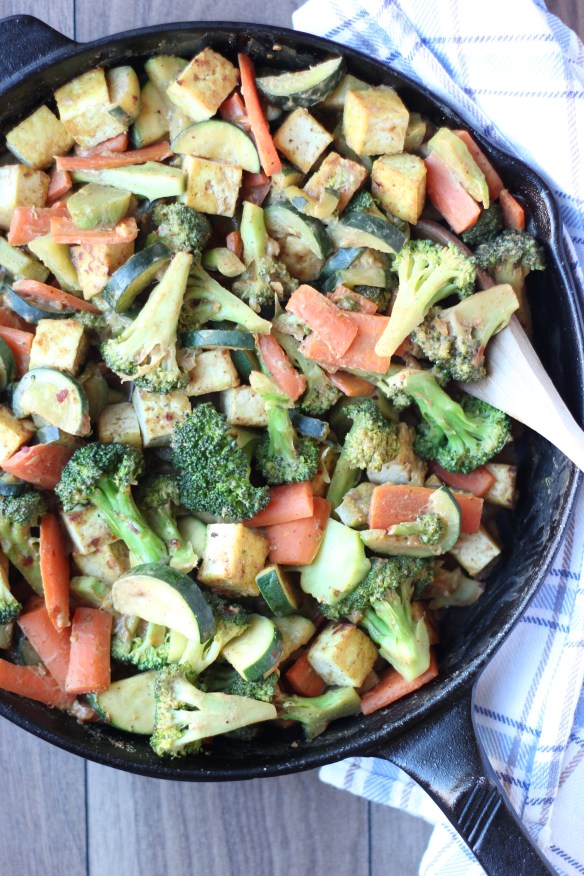
It really is a pretty simple and versatile recipe. Sub in whatever veggies you like  – mushrooms, peppers and baby corn would work beautifully. But I am partial to the sponge-like quality of broccoli which tends to hoard the tasty sauce within its abundant tendrils. Whatever veggies you choose, add the ones that cook longer first, a few minutes ahead of the others. You can easily make the almond butter sauce nut-free by subbing in tahini. If you like garlic, add some of that in along with the ginger – I’m  not a garlic-hater, but I choose to do the least amount of chopping per any recipe I make. I am chopping averse. Or maybe I just like quick recipes. 

Please let me know if you make this!! You could even just make the sauce and slather it onto whatever food you please. Like friendships, this sauce makes life better…okay, here’s the recipe finally. Who lets me write anyway?

IMG_3895

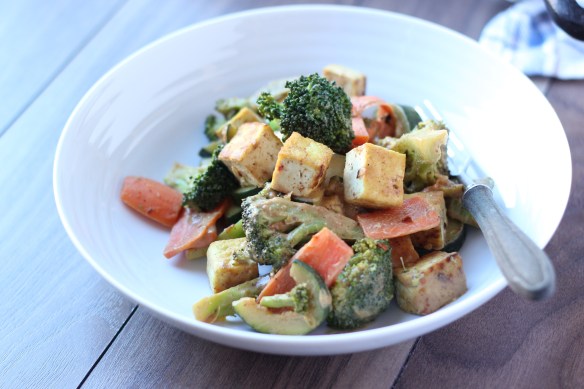
Simple Veggie and Tofu Stir Fry + Almond Butter Sauce

Serves 3-4

Prep Time 15-20 minutes

Cook Time  20 minutes

Ingredients for Stir Fry:

1 block of extra firm tofu, cubed

1 Tablespoon coconut oil, or other neutral tasting oil

1-2 Tablespoons minced fresh ginger, to taste

2 Tablespoons water

2 Tablespoons tamari

1 bunch of broccoli or cauliflower, trimmed and cut into bite-sized florets

3 carrots, peeled and sliced into desired shape

2 zucchini, sliced into desired shape

Ingredients for Almond Butter Sauce:

4 Tablespoons roasted almond butter (may be substitutes with natural peanut butter, or tahini for a nut-free version)

4 Tablespoons freshly boiled water

2 Tablespoons tamari sauce

3 Tablespoons natural rice vinegar

1 teaspoon maple or agave syrup

1 teaspoon red pepper flakes (optional)

 Directions:

1. In a large non-stick sauté pan or wok, heat coconut oil over medium-high heat. Add cubed tofu and cook, stirring often, until golden brown on most sides, about 10 minutes. Remove from pan onto a plate.

2. Reduce heat to medium and to the same pan add minced ginger, 2 Tablespoons tamari sauce, 2 Tablespoons water and broccoli or cauliflower. Stir well and cook 3-5 minutes. Add carrots and zucchini and cook 5 more minutes.

3. While vegetables are cooking, in a medium bowl whisk almond butter and freshly boiled water with a fork until smooth, add the rest of the ingredients and whisk until combined. Adjust to taste.

4. Add almond butter sauce to the vegetables and stir to combine. Add tofu back to the pan, stir and cook 1-2 more minutes until flavours meld together. Enjoy!

IMG_3897

Indian Spiced Chickpea Skillet Cake

img_3714-4

Here in Southern Ontario, the Greater Toronto Area to be exact, we experienced what is akin to a heat wave in winter this past weekend. Temperatures in the (low) double digits (Celsius that is) warmed our bodies and our souls and an abundance of sunshine made everything seemed brighter. Sigh, we collectively needed this! Or at least I needed this. Days like this weekend remind me that everything is going to be okay. Life will be okay. More than okay! Spring is around the corner, we just have to hang in there for a few more weeks.

You know what else warms the body and soul? Spicy, flavourful, easy dishes made with nourishing ingredients. You might have noticed that I love spice. A lot of spice. Like, all the spice in the world. And by spice I mean spices AND heat. In my world, the hotter the better. It’s like an addiction and I often crave spicy foods. My sister gets me. She’s just the same.

img_3718-3

In this spiced chickpea skillet cake the spice comes from some wonderfully robust Indian inspired spices like cumin seeds and fresh ginger, as well as from green chilies which you can dial up or down based on your preferences. You can guess which direction I went! This skillet cake is modelled after an Indian dish called dhokla, if only in flavours and ingredients, not actual execution. Traditional dhokla requires a pressure cooker to make and yields a spongy, super light savoury cake. Like a cloud in your mouth! I rely on baking powder to help achieve a bit of this airiness, though my recipe creates something much more dense and filling. In any case, it’s taste is reminiscent of dhokla and that is all I can wish for. To make it a bit more traditional you could drizzle the finished skillet cake in black mustard seeds and chopped green chilies fried in oil. Alas, no mustard seeds in my cupboard and the stores were closed due to a holiday. I decided to go for it anyway!  

img_3706-2

I love using chickpea flour as it is super cheap (I buy it at a bulk store) and packed with fibre, protein and a host of micronutrients. One 1/2 cup serving of chickpea flour (also known as garbanzo flour or besan) provides you with 10 grams of protein and 5 grams of fibre, as well as about half of your daily folate and a quarter of your daily iron requirements. Please ask me where I get my protein from the next time you see me. It’s also naturally gluten-free (though if you have Celiac disease please buy it in sealed packages!)

Please excuse the seemingly long instructions but I get chatty. And also I needed to explain how I MacGyvered my skillet to have a snug lid to fit over top of it. Yup, using skills in the kitchen!

img_3720-4img_3738-3

Indian Spiced Chickpea Skillet Cake

Serves 4-6

Prep Time 15 minutes

Cook Time 10-13 minutes

Ingredients:

2 cups chickpea flour

1 Tablespoon baking powder

1/2  teaspoon ground turmeric

3/4 teaspoon sea salt

Freshly ground black pepper

2 cups water

2 Tablespoons fresh lime juice (from 1 small lime)

1/4 cup roughly chopped fresh cilantro, packed

1 Tablespoon neutral-tasting oil (avocado, canola, grapeseed, refined coconut)

1 Tablespoon cumin seeds

1 teaspoon coriander seeds (optional)

1 Tablespoon finely minced fresh ginger

1-2 chopped green chilies, leave seeds in

Garnish: chopped fresh cilantro, sliced green chilies, lime

Directions:

1. In a medium mixing bowl, whisk chickpea flour, baking powder, salt and pepper to combine. Add water and lime juice and whisk well, ensuring batter is smooth and lump free. Set aside.

2. Choose an oven-proof, non-stick frying pan or well seasoned cast iron skillet, for which you have a tight fitting lid (I used a lid from a large stock pot and used a couple of pieces of tin foil to plug the gaps along the rim of the skillet). Heat oil over medium-high, then add cumin seeds, coriander seeds, ginger and chilies. Fry, stirring often, until fragrant and seeds begin to pop,  about 1-2 minutes.

3. Add fried spices, ginger and chilies to chickpea batter and whisk in. Don’t worry if you don’t get every seed and bit from skillet. Place skillet back on the stove and turn heat down to low. Carefully pour chickpea batter into the skillet and cover with the lid (no peeking – the key is to allow steam to build up and help in cooking the cake.) Cook over low heat for 6-8 minutes, until bubbles appear on surface and mixture starts to set (you will notice the top of the cake will start to dry out and become less jiggly.) Be careful not to burn the skillet cake! Low heat is key here. While cake is cooking on the stove top, set oven on to broil.

4. Once batter is mostly set, remove from heat, remove lid and place skillet on middle rack and broil for 2-3 minutes. Watch carefully to ensure skillet cake does not burn! This is not the time to walk away and start a new task. Carefully remove skillet from the oven (it’s hot!) and allow to cool. Once cool enough to handle, you can flip the  skillet cake out of the pan onto a serving plate, or serve straight  form the skillet. Top with desired garnishes. It tastes best when warm, so eat right away! Or store leftovers in the fridge and reheat before eating.

img_3763-2img_3760-2

And now for a PSA: Let me know if you make this recipe! Share with your friends! Like and comment below!

xo

Enjoy life and good food and sunshine,

ilona

Red Kidney Bean Curry (Rajma)

img_3414

Sometimes life hands you lemons. Kernels of sourness. Little moments or truths or revelations that just make you pucker up and shake your head in disbelief. Like really universe? This is what you’re going to throw my way? You want to laugh and cry at the same time, on one hand feeling frustrated with the parade of disappointments, but on the other cherishing these moments for the inevitable memoir that will surely entertain the masses. In any case, I’ve learned that it’s best to take the Buddhist path in these instances – let go, live in the here and now and don’t sweat the future. Call up a good friend, shed a few tears, eat a cupcake, then laugh at the audacity of life. Good food helps. Especially a dish that warms from within to chase away the winter chill and nourishes your body with plant-based goodness that pairs plenty of exotic (but easy to find) spices with otherwise simple ingredients. This red kidney bean curry is known as rajma and hails from Northern India. Now let me qualify that a Polish-born Canadian girl making a very traditional Indian curry might take some  liberties with the recipe so this may or may not actually resemble what a real rajma looks or tastes like, but nevertheless I love (LOVE) the results. In fact, now that I think of it, I’m not sure if I’ve ever actually eaten authentic rajma. I’ve heard lots about it from friends and the families of South Asian decent that I counsel in my role as a dietitian (apparently rajma is a beloved dish for many children.) I’ve read and researched plenty of recipes when I decided to make my own many years ago – I can only guess at how close mine is to the real thing. In any case, as I said, the recipe that follows creates a beautiful, spiced dish that satisfies.

img_3375img_3362img_3357

Red kidney beans are part of the pulse family (which includes beans, peas and lentils) and Canada is the world’s second largest grower of this nutrient-packed bunch (right after India). Alberta, Saskatchewan, Manitoba, Ontario and Quebec grow hundreds of varieties and exports are a billion dollar industry! Talk about home-grown gold. Pulse Canada does an amazing job curating recipes, factsheets and lots  of great information about pulses – please check out their website. While 2016 was the Year of Pulses,  they are not going anywhere. In fact, pulses are gaining popularity and a larger share of the real estate on our plates. And this is no surprise really, they are incredibly cheap, versatile, brimming with protein and nutrients and hailed as a sustainable crop. The future is pulses! Did I mention the nutrients??

img_3269img_3312img_3299img_3328

I used canned kidney beans for this recipe but give dried beans a chance too. They just require soaking overnight, then a quick rinse and boiling the next day. Mostly idle work. I make big batches at a time then store in zip top bags in the freezer. Check out cooking guidelines for various pulses here. I should  also say give (dried) peas a chance as well. Hehe.  

img_3352

Red Kidney Bean Curry (Rajma)

Serves 4

Prep Time 15 minutes

Cook Time 30-35 minutes

Ingredients:

3 Tablespoons avocado oil, or other neutral tasting oil (grapeseed, canola)

1 medium/large sweet onion, roughly chopped

4-5 cloves of garlic

2 inch chunk of ginger, peeled

1 Tablespoon cumin seeds

1 teaspoon red pepper flakes or 1 Tablespoon finely chopped fresh red chile, or to taste

1 teaspoon garam masala

1/2 teaspoon ground turmeric

1/2 teaspoon ground coriander

1 teaspoon salt, or to taste

1/4 teaspoon freshly ground black pepper, or to taste

4 medium tomatoes, chopped

2 (19oz/540ml) cans of red kidney beans, drained and rinsed

1 1/2 cups water

Cooked grain of your choice (rice, quinoa, sorghum, millet) or flatbread, for serving

Chopped fresh cilantro, lime wedges and chopped red chile to garnish (optional)

Directions:

1. Add ginger and garlic cloves to bowl of food processor and process until finely chopped (about 30 seconds). Add onion to the minced ginger and garlic and pulse until chopped. Alternatively, if you don’t have a food processor, mince ginger and garlic, and finely chop onion with a knife.

2. Heat oil in a large saucepan on medium heat, add ginger, garlic and onion and cook until soft and translucent, about 3-5 minutes.

3. Add in cumin seeds, red pepper flakes or red chile, garam masala, turmeric, coriander, salt and pepper, stir to combine and  cook until fragrant, about 1-2 minutes.

4. Add in chopped tomatoes, including any juices, stir to combine, and simmer uncovered for about 15 minutes, stirring often, until liquid has mostly evaporated and the oil starts to release from the mixture. Reduce heat to medium-low if mixture starts to bubble too fast and sticks to the pan.

5. Add in kidney beans and water, stir to  combine, cover with lid slightly askew (to allow steam to escape) and cook for about 8-10 minutes until curry thickens, stir from time to time to make sure curry does not stick to the bottom of the pot. Take off the heat. If desired, using a potato masher, mash some of the kidney beans in one corner of the pot; this will thicken the sauce a little bit while keeping most of the kidney beans whole.

6. Serve with cooked grains or flatbread and garnish with toppings as desired.

Tips:

You can add more water to the curry after the last step if you prefer a thinner consistency.

You can buy all the spices at a bulk store if you prefer to buy smaller amounts.

img_3364

img_3423

Harvest Kale and Roasted Butternut Squash Salad with Creamy Maple-Cider Dressing

img_2630

Here’s what I know about kale. It is hardy. It stands up to a greater breadth and depth of temperature, seasons and wind than any other vegetable in our garden. It thrives far longer (it continued to spill its harvest into the frigid mornings of mid-November.) It nourishes and satiates. It gives and weathers and feeds. And it needs little sustenance in return. Talk about a superfood with super powers! What I also know about kale is that I’ve been eating it for FAR longer than it has been basking in the glowing light of superfood status. My grandmother, aunts and mom have been growing and using kale in their kitchens for as long as I can remember. And while I don’t think they ever imagined its dominance as the queen of greens, they certainly knew its value. Easy to grow. Easy to cook. Easy to transform.

img_2599

img_2609

Onto this glowing recipe. Kale salad is nothing new. I’ve been making versions and incarnations of it for many years. Sometimes as the star player and sometimes as a companion to other greens. This salad though is all about the kale. It is home-grown kale paired with classic autumn ingredients to create a hearty, addictive and delicious appetizer or meal. I do highly recommend massaging the kale for this dish. Yup, that sounds ridiculous, I know. But really, it makes a difference. If you’ve ever had dry, woody kale in your salad you will appreciate this step. And doesn’t this hard working produce staple deserve a little R and R?? You’re welcome kale.

img_2652img_2640

The first few times I made this recipe I used delicata squash which works beautifully. But as luck would have  it, delicata was nowhere to be found on my grocery expedition this time. So butternut squash played the perfect understudy. And really any squash or pumpkin would do. I do love serving this salad with the squash still warm from the oven. The warmth is a great foil for the kale and sets off the zingy dressing nicely, but room temperature is just fine. Straight from the fridge the next day works too. And yes, this salad is the kind you can eat as leftovers, nothing gets soggy!

img_2680

I usually serve all the ingredients layered on a large platter or wide, shallow bowl with the dressing on the side so people can drizzle on as much as they want but feel free to do the drizzling yourself. Or just mix all the salad ingredients with the dressing. This recipe  might make more dressing than you will need but that’s not a bad  thing. It’s perfect on other greens or roasted veggies.

A hearty, warm, vibrant salad to nourish and chase away the impending winter blahs. Oh, I should say this recipe makes a pretty hefty  party sized salad. So you can always halve the quantities to make a smaller amount. But like I said, you can keep it in the fridge for a couple of days with nothing to worry about. And then change it up with some cooked quinoa or millet, or alongside a spicy soup or stew.

Harvest Kale and Roasted Butternut Squash Salad + Creamy Maple-Cider Dressing

vegan, soy-free, gluten-free

Makes a party sized salad

Prep Time 20 minutes

Cook Time 35-40 minutes

Ingredients for the salad:

2 bunches of kale, washed, ribs removed, chopped into bite sized pieces (about 12 cups)

1 butternut squash, peeled and cubed (about 8 cups)

2 Tablespoon extra virgin olive oil, divided

1  Tablespoon apple cider vinegar

1.5 Tablespoons maple syrup

1 teaspoon salt

1/2 teaspoon freshly ground pepper

1/2 teaspoon ground cinnamon

1/4 teaspoon ground cloves

3/4 cup raw pumpkin seeds

3/4 cup dried cranberries, chopped

1 batch of creamy maple-cider dressing

Directions:

  1. Preheat oven to 450˚F. Line a large rimmed baking sheet with parchment paper.
  2. In a large bowl drizzle the kale with one tablespoon of olive oil and the apple cider vinegar. Gently squeeze and massage the kale until thoroughly coated with the oil and vinegar. Set aside.
  3. Place the squash on the baking sheet, drizzle with one tablespoon of olive oil, all  of the maple syrup, salt, pepper, cinnamon and cloves, and toss to combine. Arrange in a single layer and roast for about 35-40 minutes, flipping once halfway through cooking time. Squash should be cooked through and browned around the edges.
  4. Heat a medium skillet over medium-high heat, add pumpkin seeds and toast until starting to turn golden and fragrant, about 3-5 minutes. Stir frequently so that they don’t  burn. Transfer onto a plate and let cool.
  5. To assemble the salad, place the massaged kale onto a platter or bowl, top with toasted pumpkin seeds, dried cranberries and roasted squash. Drizzle or toss with about 1/2-3/4 of the dressing and serve with extra dressing on the side.

Ingredients for the dressing:

1/2 cup extra virgin olive oil

1/2 cup apple cider vinegar

2 Tablespoons maple syrup

2 Tablespoons tahini

1 clove of garlic, peeled

1 teaspoon salt

1/2 teaspoon freshly ground pepper

1/8 teaspoon ground cloves

6-8 Tablespoons water

Directions:

  1. Combine all ingredients and 6 tablespoons of the water in a blender and  blend on high until emulsified. Add extra water as needed to achieve a pourable consistency.

img_2736

Green Chickpea Pancake For One

Some weekends are just the stuff dreams are made of. This one was one of them. Sunny summery skies and welcome heat (despite technically it still being spring) were the backdrop to some seriously good times: karaoke with friends, a Blue Jays game under an open dome with family and poolside pedicures + margaritas at a friend’s house. Sigh.
Driving home from today’s outing I decided I wanted to make a quick dinner so I could soak up the rest of the day’s warmth. Seems like a lot of food inspiration hits when I’m behind the wheel (see my last post)…I guess the fresh air and open road makes me think good food thoughts!
So here is my less than 15 minute veggie and protein packed creation.

image

Green Chickpea Pancake for One
Makes 1 serving

Prep time 5 minutes
Cook time 10-12 minutes

Ingredients
1/3 cup chickpea flour
1/3 cup + 1 Tablespoon water
1 large handful baby spinach
1/4 teaspoon salt
Fresh ground pepper
1/3 cup frozen green peas
1 teaspoon coconut oil

Toppings
Avocado
Green peas
Cucumber, sliced
Crushed Hot Chili Peppers
Other ideas: hummus, vegan cream cheese, mixed greens, roasted or sautéed veggies

1. Put chickpea flour, water, spinach, salt and pepper in a blender and blend until smooth. Adjust seasonings.
2. Add frozen green peas and stir.
3. Heat 1 teaspoon coconut oil in non-stick frying pan over medium heat. Pour batter onto pan, spread out evenly. Cook 4-5 minutes on each side, until slightly golden (being careful when flipping pancake). Place onto a plate and top with desired toppings.

I also love having this type of pancake for breakfast as I prefer savoury first thing in the morning. You can change up the additions or even omit the spinach to make a non-green version (but why would you?? Green is the new black.)

image

On a side note I have a serious addiction to this crushed hot chili peppers sauce – I get it from a local Italian market. I first found something similar at a farmer’s market in Italy. Hooked ever since. I put that shhh on everything! I find reasons to eat. Everything else is created to be a vehicle for this amazingness. It is fiery hot and I adore it that way.

image

image

Wishing you all a wonderful, plant-fuelled week ahead!

Xo

ilona

Veggie and Rice Nori Bowl with Tempeh + Green Tahini Sauce

Summer weather is upon us, in my part of the world anyway. Somehow, despite the sunshine, I am coaxed back into the kitchen to create something fresh and vibrant to nourish my body. Most (sane) people avoid the kitchen when the thermometer shoots up. But, alas, sanity is not my strong suit. Fresh from an hour of weight training, I conjured up this bowl while driving home. Truthfully, minimum oven/stove time was on my mind. As a side note, I really need to start keeping a notebook close by for when inspiration hits – I often think up food ideas and then promptly forget to make them. And then forget all about them. Not this time! I got home, set the rice to cook, and got busy chopping veggies. I did my food prep outside to squeeze in every ounce of this warmth and long daytime hours  (it’s 9pm as I type and still light out!)

image

image

I must have had sushi on my mind (which, now that I think of it, makes sense – we’re planning a sushi night with friends) because the result definitely echoes deconstructed sushi (read: too lazy or inept to roll sushi so just gonna pile it all into a bowl.)

image

In any case, it turned out awesome! Filling, vibrant, verdant, nourishing. And fast.
I must note that the quantities of veggies seem big, but I LOVE my veggies, and leftover veggies aren’t really a bad thing, right? You might also have leftover sauce – just use on roasted veggies or cooked grains. Would be great on roasted potatoes.

image

Veggie and Rice Nori Bowl with Tempeh + Green Tahini Sauce
Makes 4-6 servings

Prep time 20 minutes, cook time 25 minutes (if rice starts cooking as you prep veggies)

Veggie and Rice Nori Bowl
1 cup short grain brown rice, dry
1 head of broccoli, chopped into bite size florets
1 head of cauliflower, chopped into bite size florets
1-2 zucchini, sliced
2-3 inch fresh ginger, julienned
2-4 cloves garlic, sliced
1 Tablespoon sesame or coconut oil
3-4 Tablespoons tamari sauce
3-4 Tablespoons water
Raw nori sheets for serving

1. Cook rice according to directions.
2. Heat oil in very large wok or skillet over medium-high heat, add ginger and garlic and stir fry for a minute.
3. Add cauliflower, broccoli, tamari and water. Stir fry for 6-8 minutes (until slightly cooked but still crisp). Add zucchini and stir fry another 2-3 minutes. Set aside.

Tempeh
1 block tempeh, sliced lengthwise into 1/4 inch slices
2 teaspoons coconut oil
1 Tablespoon tamari

1. Heat oil in non-stick frying pan over medium-high. Lay tempeh slices in one layer on frying pan, cook 3-4 minutes per side, until golden.
2. Take off heat and sprinkle tamari over tempeh. Set aside.

Green Tahini Sauce
1 small bunch parsley, trimmed (can leave stalks)
1/2 cup tahini (sesame paste)
1/4 cup fresh lemon juice
1/2 cup water
1-2 cloves garlic
1 Tablespoon light miso
Fresh ground pepper to taste.

1. Place everything in blender or food processor and blend until smooth.

Assemble bowl: place nori sheet in bowl, add rice, a generous amount of veggies, a few slices of tempeh and drizzle with sauce. Enjoy!

Variations: instead of rice you can use quinoa or millet; instead of tempeh you can use tofu, chickpeas or beans.

Grain and veggie bowls are about the easiest meal you can make and the combinations are endless! Enjoy 🙂

Xo

ilona

Quick and Delish Summer Dish

Hello dear readers. It’s been a while. Too long. But here I am again, for better or worse!

I spent this beautiful, perfect summer day waiting around for the internet guy to finally reconnect me to civilization. He showed up 15 minutes before the 4 hour window they gave me as my appointment time was up. Anyone else think this practice is ludicrous?? Hey, I’m coming over for dinner. When? Oh, I don’t know, sometime between 4 and 8. Anyway. I’m almost over it.

So I did what any other food lover would do with spare time. I cooked. Now, I’m not the type of person that is particularly averse to cooking in any sorts of weather, but it does occur to me that most people don’t want to spend oodles of time in the kitchen when the sun is blazing outside. And so here is a quick little number I pulled together in about 20min or so with ingredients I had on hand. When I execute these spontaneous acts of cookery, I like to think in groups. Nutrient groups, food groups, deliciousness groups, whatever you want to call it. Here is what I aim to include in a nourishing dish I concot on the fly:

Veg – anything goes! the possibilities are essentially limitless
Whole grain – my faves are quinoa, millet, rice, gluten-free pasta, sweet or white potato (while not technically a grain I throw the potato in this category for it’s starchy nature)
Protein – beans, lentils, chickpeas, tempeh, nuts, seeds

Pick something from each group, add the magic of flavour (spices, herbs, tamari, miso, citrus juice and zest, oils, vinegars, broth, condiments…I could go on). And there you have it.

Millet, Greens and Legumes in Miso Sauce

1/2-1 cup dry millet (see cooking instructions here)

a whole whack of kale, washed, large stems removed, chopped in bite-sizeish pieces (the more the better, this green cooks down A LOT)

1 cup frozen peas

1-2 cups beans of your choosing (I used leftover chickpeas and broad beans that I had in freezer, you can use canned or store-bought frozen)

For sauce: whisk together 2 Tbsp of miso paste (I used the white variety), 2 Tbsp rice vinegar, 2 tsp sesame oil, 2 tsp maple syrup, a dash or two of hot pepper sauce of you choose, and about 2-3 Tbsp of water

Heat a teaspoon or two of sesame oil in large saucepan over medium-high heat, add kale and a few splashes of water and let it hang out until wilted and getting tender (a few minutes). Use tongs to move it about. Add frozen peas and beans, cook until defrosted. Add sauce and let it all come together for a minute or two. Add millet (I used 1/2-2/3 of the amount that 1 cup of dry millet cooked up…will use leftovers in salads, soups or breakfast porridge). Stir it all together, the millet will absorb the delicious sauce.

Enjoy! Preferably with a cold beer.

Happy lazy summer days,
ilona

PS No picture. The beer made me sleepy.

Back In The Game (plus recipe for Kale and Bean Soup)

Well, I am FINALLY feeling like myself again. I can safely say my body is virus-free. Hallelujah.

Can’t say I was feeling much food inspiration over the last little while. Although I’m not of the lose-all-your-appetite-while-sick sort (and damn it I do envy the people who get blessed with this silver lining of illness), my food selection was completely lack luster and I don’t think I attempted much beside boiling water and toasting bread in the kitchen, oh and heating up soup from a carton.

I managed to stay on the vegan bandwagon for two weeks now, viral attack and all. I have to say though, while I certainly don’t feel deprived and I can’t say I’ve even toed the precipice of starvation at any point, I have had some niggling thoughts about sneaking a few bites of cheese. Or milk chocolate (which is strange as I prefer dark varieties typically). I even had a dream where I pigged out on a milk-laden chocolate bar and woke up with residual feelings of guilt that the dream embedded. But honestly, all this has been minor.

In fact, beyond the illness stage, I continue feeling inspired and excited by all the vegan foods and recipes I keep coming across. As my sickness waned towards the end of the week, I found myself enveloped by a plethora of food experiences this weekend.

First off, my brother bought a juicer. Super exciting! We juiced the second the beast came out of the box. So far a winning combo has been apples, kale and ginger  Delish. I came up with a concoction that echoed the flavours of carrot cake: tons of carrots, apples, a bit of ginger and a few shakes of cinnamon and cloves. Yum! And of course there’s been a few underwhelming, and perhaps down right awful, results too. Will keep you updated on our juicer developments!

On Saturday night I made the pilgrimage to downtown Toronto for some of my favourite Thai food at Salad King. I can’t comment on the authenticity of the grub but I have been eating here since my Ryerson University under-grad days. I even remember what my first dish was, and this was back in 2002! Emerald curry, by the way. The location has moved (a few meters from the original) but the crazy atmosphere, affordable prices and consistently amazing dishes have remained. Even the mild to 20 chilies heat scale has not changed a bit. I am a 5 chilies type of gal…hey, some like it hot 🙂

I dined on my beloved Bangkok Stir Fry (veganized by omitting the egg) and my dining partner-in-crime chose the Hot Thai Noodles with a very non-veg chicken and shrimp option. We stuffed ourselves silly and walked away wishing for a location closer to home. Sigh.

My good food fortune continued into Sunday as we gathered at my parents place for dinner. My mom obliged our veggie ways and cooked up an amazing vegan kale and bean soup. Sooooo good!

Kale and Bean Soup 1

 Kale and Bean Soup

This is a delicious soup to serve on a chilly day. Much goodness is to be found in this gem of a dish.

Adapted from: The Vegetarian Collection by Alison Key and The Canadian Living Kitchen

  • 2 Tbsp olive oil
  • 1 large onion, diced
  • 3 cloves garlic, minced
  • 2 tsp ground coriander
  • 1 tsp ground cumin
  • salt and pepper to taste (1/2-1 tsp of each)
  • 4 cups vegetable broth, homemade or store bought
  • 4 cups of water
  • 4 small white potatoes, diced
  • 1 large sweet potato, diced
  • 1 can (395ml, 140z) cannelini beans, rinsed and drained, used Eden Garden brand
  • 2 cans (395ml, 14oz each) navy beans, rinsed and drained
  • 2 bunches of kale, trimmed and chopped
  • 1 cup parsley, roughly chopped
  • juice of one lemon

Heat olive oil over medium heat. Add onion, garlic, coriander  cumin, salt and pepper and cook for about 5 minutes, until onion is soft and translucent.

Add broth, water, white and sweet potato and all the beans, bring to a boil then simmer, covered, until potatoes are tender (about 15-20 minutes).

Meanwhile put kale into a pot of boiling water and boil for about 10 minutes until softened. Drain and add to the soup along with the parsley. Simmer for another 5 minutes, then finish off with the lemon juice.

Serve as is or accompanied by whole grain bread, pita or a cooked grain (rice, buckwheat, quinoa or the like). Enjoy piping hot.

Kale and Bean Soup 2

Kale and bean soup 3

 My mom also surprised us by baking vegan chocolate chip cookies. No milk or eggs, and incidentally no wheat, but full of chocolatey goodness. Best served with beverage of choice for dunking. Recipe was from good old reliable Martha Stewart.

Vegan CC Cookies 2

Vegan CC Cookies 1

Way to go mama! First one to experiment with vegan baking. But that’s not shocking, baking is in her blood.

Vegan CC Cookies 3

I wrapped up my Sunday evening by prepping for the work week. Cooked up a one skillet meal using ingredients already in my fridge and pantry for lunches and dinners; will post the recipe this week. Main ingredients were fennel bulb, green peas, quinoa and Tofurky sausage. Don’t mock me, I love them.

And I whipped up a batch of hummus. I don’t really use a precise recipe, more so a guideline I suppose. But I will try to account for the proportions next time I make it so I can share the magic that a few simple kitchen staples can create: chickpeas, tahini, garlic, lemon juice and good-quality olive oil. That’s all.

Happy February everyone!

ilona

BYOL – Bring Your Own Lunch

Happy Tuesday!

Just finished my lunch….I had been thinking about devouring it since about 9:33am. Last night I made sweet potato fries (will post a recipe for that soon) and crispy breaded tofu from one of my new fave vegan blogs, Oh She Glows. Do check it out. Looking at the delectable recipes on this site turned my “maybe I’ll try vegan” to “oh, yes, I can do this”.

Wish I had some pictures to go along with this post but it being winter (and frigid at that), it was to dark for an impromptu photo shoot last night. And I didn’t have a camera at work. Nevermind that my coworkers might think I’ve gone a bit nuts photographing my food. So I’m going to work on this and hope to entice you with some snapshots in the coming posts.

I also had some last bits of a tabbouleh I made on Saturday, as prep for our going-veg-challenge. Will post the recipe tonight, along with a pic. Here’s a little hint of what’s to come: delicious and supercharged with nutrients.

See you later!